Showing posts with label PC tricks. Show all posts

Sunday, January 8, 2012

Notebook lock (Kensington Security Slot)

Theft of notebook, netbook, or even LCD Monitor is not uncommon. The motif is targeting data stored in hard disk, or commercial value of these items, the latter is common in developing countries in which such items highly valued. 

I recently use a notebook lock to avoid theft (I often enough meet colleagues whose notebook are lost stolen). This rope is made form metal wire, to ‘tie’ notebook to a table leg or other immovable items. This rope is strong enough that a large strong pliers is needed to cut it off. Every notebook has a slot to be connected to this lock, so does netbook (so does LCD Monitor).  This lock/rope costs $2-$5, far less expensive compared to value of items it protects, but it offers effective protection. 

Stumble Upon Toolbar Add to Technorati Favorites

Friday, December 16, 2011

How to clean CPU heatsinks

After several months, CPU heatsink often accumulates dust. This may jam heatsink fan or block air circulation. If CPU overheats, we may have to replace it with a new one.

It is important to clean heatsinks in CPU or graphic card regularly. I had a broken graphic card because of accumulating dust in heatsink fins - blocking air circulation. My CPU once had dust accumulated in its heatsink. BIOS showed CPU temperature reached 71° C. But after I cleaned it, CPU temperature was always constant in 60° C.

Brush is OK, but we must remove CPU fan first. It is easier to use vacuum cleaner and plastic pipe. We just need to fasten this pipe to vacuum cleaner suction using adhesive tape. This pipe should be small enough to go between CPU fan blades. Vacuum cleaner suction is strong enough to suck and clean dust from a heatsink.

It is important to prevent dust accumulation in heatsinks (like in CPU and graphic card) and power supply vents, as disturbed cooling system may lead to damages to these components.

Stumble Upon Toolbar Add to Technorati Favorites

Thursday, December 15, 2011

How to open docx in MS Word 2003

Docx is a new format in MS Word 2007 and later, so by default MS Word 2003 is unable to open and edit documents in docx format. Personally, I am reluctant to use MS Word 2007 and later, because its design is far different compared to previous version of MS Word. Users should familiarize themselves to new design in MS Word 2007; this is my main reason not to use it as replacement.
.
There are two methods to open docx in MS Word 2003:
  1. I installed MS Word 2007 side by side with MS Word 2003. Afterwards, MS Word 2003 is able to open docx without problem. I still prefer MS Word 2003, but installing MS Word 2007 can make us more familiar with MS 2007. 
  2. Microsoft Office Compatibility Pack for Word, Excel, and PowerPoint File Formats. This plugin enable MS Word 2003 to open docx (and MS Excel 2003 and MS PowerPoint 2003 to open xlsx and pptx respectively). Some windows updates are required to install this program. 
-

Stumble Upon Toolbar Add to Technorati Favorites

Thursday, May 26, 2011

Autorecover in Microsoft Word 2007

A sudden blackout may interrupt works, especially when we are using word processor like Microsoft Word. If we haven’t saved a document we are working on, power loss may cause loss of entire work. There is Autosave feature in Microsoft Word to prevent data losses because of sudden blackout.
.
By default, Microsoft Word always saves opened document every 10 minutes. This means sudden power failure only makes a user loses data typed 10 minutes ago at most. To minimize loss, Autosave should be set to save automatically every 1 minute. To change this setting, click Office Button in Top Left window of Microsoft Word 2007 – choose Word Option – click Save tab. Change Save Autorecover information every to 1 minute. Now MS Word will automatically save document every 1 minutes.

After sudden power loss, MS Word will automatically open autosaved file, at most user only loses data typed 1 minute before power loss. This is autorecover data, and should be saved with another name to save it permanently.
-

Stumble Upon Toolbar Add to Technorati Favorites

Tuesday, April 19, 2011

jwgkvsq.vmx : A tool to remove

Do you ever have Recycler folder in your flash disk? There is a file named jwgkvsq.vmx inside it. It duplicates to every flash disk attached to infected computer.

It is called Conficker, in my experience it isn’t really dangerous. I call it annoying, not dangerous. It is annoying for it duplicates itself to every FD attached to USB. We could have complaint from others who use our computer or those who have data travelers.

I got a tool to remove this Conficker. This small toll scans all drives and registry. After scan completed, reboot is required. An additional feature from Microsoft is needed to prevent repeated infection. Download  this tool here.
-

Stumble Upon Toolbar Add to Technorati Favorites

Monday, March 14, 2011

How to share printer through network

One benefit of networking is it is ability to share a printer connected to a computer to network. So, a printer does not need to be moved every time to print certain documents. As long as printer is connected to a computer, other computers in same network have ability to use it too.
-
To share a printer, certain setting should be done in PC in which printer is connected:
  • Go to Start - Control Panel – Printers and Faxesright click and choose Properties on printer to be shared; in this case I use Epson Stylus T11.
  • Select tab Sharing and choose Share this printer. Give a name you want (by default, in Epson T11 its name is EPSONSTy). Click OK and everything is finished
Now if a client of network want to use this shared printer, printer can be added by adding new printer in Control Panel – Printers and Faxes, choose A network printer, or printer attached to another computer, click Next and type address of shared printer. It consists of IP of computer with shared printer attached and name of shared printer, e.g. \\192.168.1.1\EpsonSty. If username and password is asked, use an account and password in computer with attached printer.
-

Stumble Upon Toolbar Add to Technorati Favorites

Saturday, March 5, 2011

How to identify sound card model in your PC

Sometimes, we can't find anywhere CD driver of our PC motherboard contains drivers for sound card, LAN card, and VGA card. Usually, Windows XP is able to identify these card if it is not on-board (included in motherboard circuit). Any card inserted to PCI is usually recognized by Windows XP, but on-board cards (usually sound and VGA cards) are rarely recognized without 3rd party drivers.
To identify sound card, please look at a small IC chip located in bottom left of motherboard, it is so small so look carefully at what written on this chip (location within red boundary in the picture). It is a usual location for sound card circuit in motherboard. If your motherboard has sound card from Realtek, C-media, etc, its model is written right on the black surface of the chip. After that we can use Google to search and download its driver. There many available driver in internet, just pick the correct one!
-

Stumble Upon Toolbar Add to Technorati Favorites

Thursday, March 3, 2011

Solving Error: Generic Host Process for Win32 Services

Computer with Windows XP SP2 OS occasionally has this typical error. An error message appears and disturbing several service.  I met this problem when my computer has its printer shared to network (I don’t know other disturbed services). When this error message appears printer sharing won’t work, computer should be rebooted to make it normal again, no other options. Trouble is worsening when error appears when printer is in operation, printer stops to print in the middle of document printed.


This error can be eliminated through editing registry, but it is just like paracetamol, reducing pain but disease still remain. Error message won’t appear but printer sharing still in trouble.
 
I solved this problem by updating Windows XP SP2 to Windows XPS P3 through internet connection. I think this is the simplest solution, after all this error is completely solved. It is just connecting computer to internet and update it to SP3, and BUZZ! Everything solved.
-

Stumble Upon Toolbar Add to Technorati Favorites

Tuesday, October 19, 2010

How to install Windows XP from USB Flash Drive

Windows XP installation from USB flash disk has several advantages. Installation goes smoothly compared to installation from CD, in which slightly broken surface of CD may halt process of copying files. After installation, USB flash disk can be erased again for another use as common data traveler, something a CD is unable to do. Moreover, now there are netbooks, their small size does not have CD/DVD drive, so installation must be from USB CD/DVD ROM or USB Flash Disk.
.
To make a USB Flash Disk with booting ability to install Windows XP, first an application, WinSetupFromUSB, need to installed. After installation, run WinSetupFromUSB and this windows will appear.

  1. Select source of Windows XP files installation, to speed up process, copy entire CD of Windows XP to a folder in Hard Disk.
  2. Select USB drive destination, usually it is autodetect. 
  3. Before making bootable USB Flash Disk and copying process, USB Flash Disk should be formatted, it is recommended to use NTFS file system.
  4. Entire preparations are completed, click GO to start process.
After clicking GO button, a process to make Windows XP installer in a Flash Disk is starting, please be patient because it takes place around 10-20 minutes.
.
To install Windows XP from a Flash Disk, insert Flash Disk to USB slot, and in BIOS set booting option to boot from USB HDD or its analog (different BIOS manufactures may have different naming). Windows XP installation process from USB is not different compared to installation from CD/DVD ROM. We also can install Windows 7 from USB Flash Disk.
.
Note: After Windows XP installation from USB Flash Disk, sometimes a problem occurred during Microsoft Word or Microsoft Office installation. To fix this, see here!

Stumble Upon Toolbar Add to Technorati Favorites

Thursday, October 14, 2010

Enabling Folder Options disabled by virus in Windows XP

Sometimes virus disables Folder Options in Windows Explorer, it can be very frustrating if users want to work with menu in Folder Options. The main problem lies in registry, so a certain value in registry editor need to be changed. If registry editor also being disabled, re-enable it first (steps are here).

To re-enable folder Options, follow these following steps:
  1. Click Start - Run and type regedit
  2. Go to HKEY_CURRENT_USER\Software\Microsoft\Windows\CurrentVersion\Policies\Explorer
  3. Find DWORD value named NoFolderOptions, change its value to 0 or delete it. 
  4. Close regedit and Restart computer
This method only works in Windows XP environment, there is also possibility that those steps above won't work because some viruses have different characteristics. If Task Manager and Registry Editor are disabled too, follow these steps to re-enable Task Manager and Registry Editor.
-

Stumble Upon Toolbar Add to Technorati Favorites

Wednesday, October 13, 2010

Enabling regedit (registry editor) disabled by virus/worm in Windows XP

Sometimes, virus or worm disables registry editor, so users can not open registry editor when they are in need to change some values in it. Usually registry editor is opened when users click Start-Run and type 'regedit', when it is disabled, a pop up message appears saying that registry editor is disabled by Administrator.

To solve this problem follow these following procedures:

  1. Click Start-Run and type 'cmd' or Start-All Programs-Accessories-Command Prompt.
  2. Type this following command: reg delete HKCU\Software\Microsoft\Windows\CurrentVersion\Policies\System /v DisableRegistryTools
  3. Press ENTER 
  4. When question 'Delete the registry value DisableRegistryTools (Yes/No)?' appears, press 'Y'
After following this steps, registry editor will be re-enabled. Usually virus/worm is the source of this problem, so it will be better to follow these steps after removing virus/worm in infected PC.

Stumble Upon Toolbar Add to Technorati Favorites

Saturday, October 9, 2010

Acer Aspire 4730Z Drivers for Windows XP

I just installed Windows XP SP2 to a notebook, Acer Aspire 4730Z. I found out that several problems occurred. Windows XP with SP2 does not have SATA driver, so I must changed option AHCI to IDE in BIOS. More problems came when CD containing drivers from its vendor only have drivers for Windows Vista. Some of them work well in Windows XP environment, but the others does not.

After successfully installing Windows XP, XP almost recognized all hardware in Acer Aspire 4730Z, except for this following components:
After XP installation, only these eight drivers need to be installed. After googling for a while, those drivers for Windows XP above are found, they work well without problems. 

Other variance of Acer Aspire 4730Z use another VGA and WLAN. They use ATI or NVIDIA as VGA instead of Intel, and use Broadcom, Intel, or Rlink as WLAN instead of Atheros, so if drivers for VGA and WLAN are not suitable for your notebook, please install other suitable drivers.

Stumble Upon Toolbar Add to Technorati Favorites

Tuesday, October 5, 2010

How to share folder in Windows XP to network

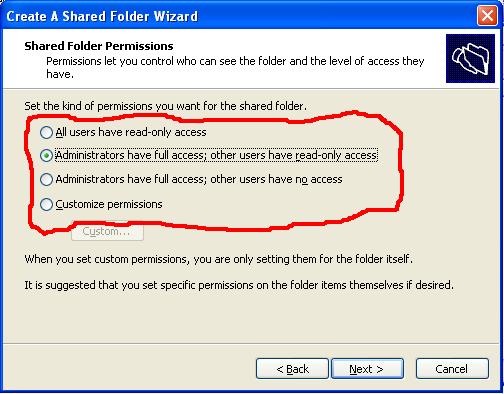
There are circumstances that a folder or even drive need to be shared to network. These are steps to share a folder to network in Windows XP Operating System.

  • In Windows Explorer top bar, click Tools - Folder Options. In Folder Options go to View - Advanced settings, make sure to uncheck Use simple file sharing (Recommended) like in this following picture!

  • After that, open Control Panel - Administrative Tools - Computer Management. Choose Shared Folders -Shares in left tab (pictured).

  • Still in that windows, point mouse pointer in right tab and right click - New File Share (pictured).

  • In opened wizard, click Next and this following windows will appear. Browse a folder intended to be shared and in Share name form type a name as you wish. Share description form can be left blank or descripted as users wishe. Then click Next!

  • In subsequent window like this following picture, set permission to users who access shared folder. Option chosen in this picture below indicate that users with Administrator account have full access, they can open, modify, delete, and save files in shared folder, whether users with guest account only open documents in shared folder. Choose appropriate permission as required!

  •  By clicking Next and Finish in window above whole steps are finished.
After finishing those steps, users from another computer connected through LAN cable or wireless can access shared folder. To access that folder, in Windows Explorer, go to Tools - Map Network Drive. In Folder form, type \\IP Address\Shared Name, in the case of above steps it is typed as  

\\123.23.22.21\Video

because computer with shared folder has IP Address 123.23.22.21 and Shared Folder above named as Video. Watch this following picture for detail.


Stumble Upon Toolbar Add to Technorati Favorites

Sunday, October 3, 2010

Download Youtube Video Using IDM (plus Firefox)

Videos posted in Youtube are not designed to be downloaded, they are to be watched online. But certain visitors prefer to download them as video files so they still are able to watch those videos even if there is no connection to internet. There are sites that offer links to those videos but they are often so crowded with visitors, make access slow or even fail.

We just need two applications, i.e. Mozilla Firefox (browser) and IDM (Internet Download Manager). Mozilla Firefox is available in Mozilla, it is a freeware application and IDM is available in its site, it is a shareware though.

After Firefox browser is readily installed, we just need to install IDM. Usually it is automatically integrated to Firefox. When restarting Firefox afterward, there is a notification that Firefox has added IDM extension. That's all. There will be IDM button above playing video when opening Youtube using Firefox (pictured) or the same button can also appear in bottom left of Firefox window. Just click this button and download starts instantly. Recent version of IDM is also integrated to Opera and Google Chrome.

Stumble Upon Toolbar Add to Technorati Favorites

Saturday, October 2, 2010

Enabling Task Manager: How to Enable Task Manager Disabled by Virus

Virus often disables Task Manager on Windows XP, or certain programs/applications also make it disabled for various reasons. There are many methods to re-enable Task Manger of Windows XP, and these are two of them.
  • Simple method: Click Start - Run and copy-paste "REG add HKCU\Software\Microsoft\Windows\CurrentVersion\Policies\System /v DisableTaskMgr /t REG_DWORD /d 0 /f" without " and press ENTER. Task Manager will be enabled quickly.
  • To understand above process, click Start - Run and type regedit, and then go to HKEY_CURRENT_USER \ Software \ Microsoft \ Windows \ CurrentVersion \ Policies\ System. On the right panel, find a value named DisableTaskMgr and delete. it. After closing regedit windows, Task Manager is re-enabled again.
If a virus disables Task Manager, usually it also disturbs other operations in Windows XP. So better to check it thoroughly.
-

Stumble Upon Toolbar Add to Technorati Favorites

Friday, October 1, 2010

Compaq Presario CQ40-324TU Driver for Windows XP

Originally, this Compaq Presario CQ40-324TU is not suitable for Windows XP operating system. As we can see, its Support in Compaq website contains only drivers for Windows Vista and Windows 7. Compaq Presario CQ40-324TU uses SATA cable for its hardisk and the problem is Windows XP SP1 and SP2 can not or do not have driver for SATA. 

This problem is solved using Windows XP SP3 that contains SATA driver. Installation of Windows XP SP3 has same steps as SP1 and SP2, and this is Drivers of Compaq Presario CQ40-324TU for Windows XP. This compressed file contains all drivers of CQ40-324TU, stored in Ziddu. Turn off download manager if it can't work to download, otherwise let it finish the job. Notify via comment if  trouble occurs in downloading this file.
-

Stumble Upon Toolbar Add to Technorati Favorites

Thursday, September 30, 2010

Problem: Unable to Instal Office 2007 in Windows XP

This is about Microsoft Office 2007 Installation problem in Windows XP. 

After installing Windows XP to a Desktop Computer or laptop, sometimes there is a problem in installing Microsoft Office 2007. This problem usually occurs if Windows XP is installed not from CD-ROM, but from USB Flashdisk or other media other than CD-ROM and its brothers (CD-RW, DVD-ROM, and DVD). A message occurs during Office installation, telling that windows is unable to update some files and office installation stops afterward (the message says "The windows installer service cannot update one or more protected windows"). So we can not install Office 2007 in Windows XP in this case, and this is a simple solution to solve it.
  • Insert Windows XP CD Installation to Disk Drive or use Windows XP ISO file (open ISO file with any application such as Winrar)
  • Go to folder folder i386
  • Choose file FP40EXT.CAB and extract or open it using Winrar or other extractor apllication.
  • Choose file Fp4Autl.dll in FP40EXT.CAB and copy and paste it to C:\Program Files\Common Files\Microsoft Shared\web server extensions\40\bin
Those are all steps required, after finishing those steps Microsoft Office 2007 installation will work without problem.

Stumble Upon Toolbar Add to Technorati Favorites

Tuesday, September 28, 2010

Quran Application, Inserting Quran in Unicode to MS Word

This is an application to insert Quran verses in Unicode to Microsoft Word. It is able to insert 114 Sura(s) in Quran to Microsoft Word document. Users can selected desired verses or translation in Indonesian (Bahasa Indonesia) and inserting them to their documents.

After installing SetupQuranInWordInd, in Microsoft Word 2007, there will be a new menu in Add-Ins tab (located in top row in right side) similar to this picture. There are options in drop-down menu to insert verses of Quran, translations, or both of them. In Microsoft Word 2003, a new menu will appear beside Help menu in top row of Microsoft 2003 window. There are not further options, installation is quick and easy.
.
This option appears after clicking Quran menu, appear looks exactly like this picture. Choose Unicode to insert verses in Unicode, otherwise verses will be inserted as certain symbol. By clicking new line, each verse of Quran is separated by line.
.
I archived this application in Ziddu, it is available here. If download manager is unable to work, turn it off and use your broser to donlod it. Sometime download manager is blocked by Ziddu.
.
Other than core application (Setup Quran in Microsoft Word), these are additional plugins of Quran translations in several languages:
Extract plugin to Program Files\Quran_In_Word to add additional translations. 

Stumble Upon Toolbar Add to Technorati Favorites

Thursday, September 23, 2010

Motherboard Drivers for ASUS P4V8X-MX (sometimes incorrectly referred as P4VBX-MX )

Another drivers for ASUS motherboard, these are drivers for ASUS P4V8X-MX that are hard too find. Sometimes it is referred ad P4VBX-MX, because 8 printed on motherboard is similar to B, so P4V8X-MX is misread as P4VBX-MX. Drivers are available for audio, chipset, LAN, SATA, USB2, and VGA. I have not able to post entire ASUS CD drivers in ISO files, so first I upload the most important contents, the drivers, here. Leave comments if these drivers are unable to work properly.
Note: Turn off your download manager if it is prevented to download these drivers!

Stumble Upon Toolbar Add to Technorati Favorites

Tuesday, September 21, 2010

P4VP-MX P4V533-MX Motherboard Drivers


Here I want to share Drivers for ASUS P4VP-MX P4V533-MX Motherboard. Like another ASUS Motherboard, drivers of ASUS P4VP-MX P4V533-MX is difficult to find. Luckily, I found a CD of ASUS P4VP-MX P4V533-MX Drivers. Keep your CD drivers carefully, sometimes it is not easy to find drivers if we lose original CD drivers. These are the drivers I stored in Ziddu:
Notes: If download manager is unable to work, turn it off (deactivate it)! Sometimes Ziddu prevent download manager from working. Notify via comments if these drivers have problems to work!

Stumble Upon Toolbar Add to Technorati Favorites
.

Locations of visitors to this page

Search Engine Submission - AddMe